Mac OS 8, running in an Electron app pretending to be a 1991 Macintosh Quadra. The virtual machine is emulating a 1991 Macintosh Quadra 900 with a Motorola CPU, which Apple used before switching to the PowerPC architecture (Apple/IBM/Motorola) in the mid 1990s.
Lake Zürich

Lake Zürich (Swiss German/Alemannic: Zürisee; German: Zürichsee) is a lake in Switzerland, extending southeast of the city of Zürich. Depending on the context, Lake Zürich or Zürichsee can be used to describe the lake as a whole, or just that part of the lake downstream of the Seedamm at Rapperswil, whilst the part upstream of Rapperswil may be called the Obersee or Upper Lake.


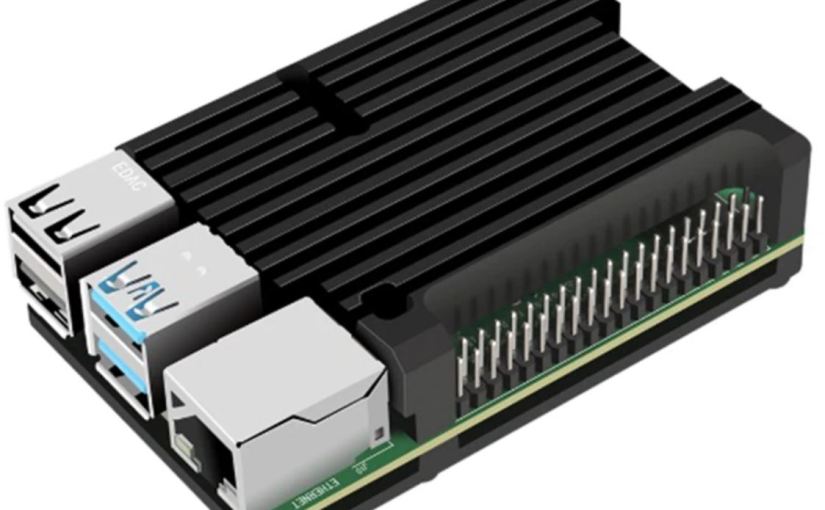
A Passive Cooling for Raspberry Pi 4
This anodized aluminium heat sink case will protect your Raspberry Pi 4 and give you the best passive cooling. It’s great for situations where you want completely silent cooling, like home media centers.

It comes with a thermal pad to provide thermal contact between the CPU and top case, and a set of hex bolts to attach the case together.

The case gives you also access to all of the ports, pins, and connectors!
- Anodised aluminium top and bottom case
- Heatsink fins
- Thermal pad
- Hex bolts and allen key included
- Access to all ports, pins, and connectors
- Compatible with Raspberry Pi 4
Setting up an Ethereum 2.0 Validator Node on Prysm Topaz Testnet
Introduction
Ethereum 2.0 is an upgrade to the Ethereum Network- and is also referred to as “Serenity”. Ethereum 2.0 validator nodes are going to be the future of how Ethereum will run and how transactions are going to be validated, which is to rely on Proof of Stake (PoS) or Staking.
Ethereum 2.0 is a protocol that is currently implemented by multiple companies and using multiple codebase (like it was done for ETH 1 clients):
- Prysm client developed by Prysmatic Labs in Go,
- Lighthouse client developed by Sigma Prime in RUST
- Firefly will be the official Geth for ETH2
- and a LOT more, an up to date list is available here.
Note that Schlesi testnet is the first multi-client Ethereum 2.0 testnet that simulates the main-net environment.
What is the expected Return on Investment (ROI)?
You can check here, but expected is annual 14.2% Return on Investment (ROI)
What software do I need to run to stake?
There are two main types of software to be aware of when considering staking on Ethereum:
Beacon nodes: This is the hub for your validators.
- Stores canonical state handles peers and incoming sync, propagate blocks and attestations.
- It has a gRPC server that clients can connect to and provides a public API.
Validator clients: Talks to your beacon node and signs blocks. You can have multiple of these at 32 ETH each.
- Stores important secrets such as RANDAO reveal proof of custody for shared data and BLS private key.
- Can swap underlying beacon nodes efficiently.
- Tracks shared state execution data and data blobs that the validator has signed.
This means that there are three possible combinations of software to run:
- Beacon node only
- Beacon node + validator client (you need 32 ETH)
- Beacon node + multiple validator clients (you need a multiple of 32 ETH)
Installation
There is 2 ways to try Ethereum 2.0 Phase 0. Use either
- The online tutorial of Prysmatic Labs https://prylabs.net/participate (Recommended)
- OR setup everything from scratch using Docker and linux (See below)
Requirements
You’ll need a virtual machine or better VPS server (Physical or using any cloud provider: AWS, Azure). Just make sure you have a decent CPU and 100GB + of SSD
I always recommend Ubuntu, ideally a Long Term Support, aka 20.04 as of today
We will use docker, so basic knowledge of command line is also required.
Start the Beacon node
The beacon node is the primary link in the beacon chain that forms the backbone of the Eth 2.0 blockchain.
docker run -it -v $HOME/prysm/beacon:/data \
-p 4000:4000 \
-p 13000:13000 \
gcr.io/prysmaticlabs/prysm/beacon-chain:latest  \
–datadir=/data
Create your validator keypair identity
This will return your newly public key.
docker run -it -v $HOME/prysm/validator:/data \
gcr.io/prysmaticlabs/prysm/validator:latest \
accounts create –keystore-path=/data
Get some Goerli ETH
You need at least 32 ETH, get a bit more like 32.5 ETH to pay also the Transaction fees. These ETH have no real value!
You can use https://faucet.goerli.mudit.blog/ or follow the instructions found on prylabs.network to use the testnet faucet.
Once your beacon node is up, the chain will be waiting for you to deposit 32 Goerli ETH into a validator deposit contract in order to activate your validator. You can withdraw ETH, but this take at least 18 hours time and adjusts dynamically depending on how many people are withdrawing at that time.
Start the Validator client
docker run -it -v $HOME/prysm/validator:/data –network=”host” \
gcr.io/prysmaticlabs/prysm/validator:latest \
–beacon-rpc-provider=127.0.0.1:4000 \
–keymanager=keystore \
–keymanageropts='{“path”:”/data”,”passphrase”:”enterPreviousPassPassphrase”}’
Wait from 5 hours to 2 days till you see the Validator activated pubKey=0x…… message in the logs.
You can see the progress of your transaction on https://goerli.etherscan.io
You can also follow the current beacon chain in Bitfly’s block explorer: https://beaconcha.in or on https://beacon.etherscan.io. Additionally, it is recommended to register your node on eth2stats.
Once you get assigned, you’ll be able to see how your validator performs its responsibility of creating or voting on blocks as well as earning any rewards throughout its lifecycle. Your beacon chain client must be synced for the validator assignment to be seen by your validator client. If you leave your validator offline for a while, it will begin to accrue penalties (0.01 ETH and more ) from the network for being idle.
You can check also https://docs.prylabs.network/docs/install/lin/docker/ or https://docs.prylabs.network/docs/prysm-usage/activating-a-validator/ for more details
how to run a tezos baking node on Ubuntu
Tezos is a decentralized blockchain that governs itself by establishing a true digital commonwealth. It facilitates formal verification, a technique which mathematically proves the correctness of the code governing transactions and boosts the security of the most sensitive or financially weighted smart contracts.
I will be constantly updating this document, if you have any issues please let me know. These instructions were used for building a node on the date specified above.

Tezos delegation only requires your public key. Your private key is not required and as such your security is never compromised.
Download Ubuntu 20.04 LTS and install it on a notebook, VMWare, ….
Note: You don’t need Ubuntu desktop edition, the server edition is more than enough, but a browser will be helpful to check the synchronization state or tzstats.
When using this setup?
For solo baking, for testing. You want to apply the mantra “Don’t trust: verify!”. You could move this setup to a datacenter but you will need to configure properly a remote signer for obvious security reasons.
Attention
This setup
- Has no guaranteed uptime nor is high available: it miss an UPS to protect from power outage, software crashes (node, baker, endorser, accuser) are not monitored nor have a restart policy.
- Is not immune to hardware failures: this would require another physical location and hardware redundancy,
- Is not protected against network failures as it use your local network/wifi: adding a 4G USB key could help, automatic network switching and load balancer should be also on your list,
- Has no monitoring system.
All the above could lead to stolen blocks and losing the baking reward.
A stolen block is one where the priority 0 baker was unavailable and the block was baked by the priority 1 (or higher) baker assigned to that block. “stealing” is a bit misleading in this case; there is no nefarious action taking place. For whatever reason, the prio0 baker had an issue (network, hardware, power, etc) and was unable to bake his assigned block. The “next guy in line” took his turn and baked. Had the prio1 baker also had issues, then prio2 would have stepped up, etc, etc, up to 64.
Note that Disruptr GmbH is in the process to offer a enterprise grade Tezos baking service on Google Kubernetes Engine:
- High availability baking, endorsing and accusing: Kubernetes private cluster with two nodes located in two Google Cloud zones,
- Remote signer connected to a Hardware Security Module,
- Support for two highly available remote signers, both having redundant access to internet with 4G access point,
- Metric-based monitoring and alerting with prometheus
- Based on Google Cloud, Terraform, Kubernetes, Docker, Ansible
Disruptr GmbH will ALSO BUILD afterward a Cardano and Ethereum 2 staking pool.
Update the system
Always keep your Ubuntu box up to date!
sudo apt update && sudo apt upgrade -y
Install some prerequisites
We will use xz-utils to uncompress Tezos snapshots later, and in order to compile Tezos from source we need some additional dependencies.
sudo apt-get install screen curl xz-utils rsync git m4 build-essential patch unzip bubblewrap wget pkg-config libgmp-dev libev-dev libhidapi-dev -y
Install OPAM
opam is a source-based package manager. It supports multiple simultaneous compiler installations, flexible package constraints, and a Git-friendly development workflow. https://opam.ocaml.org. We will install the latest stable version as of today: 2.0.7. If you use another architecture: 32 bits or ARM (raspberry Pi) don’t forget to adapt the URL
wget https://github.com/ocaml/opam/releases/download/2.0.7/opam-2.0.7-x86_64-linux
sudo cp opam-2.0.7-x86_64-linux /usr/local/bin/opam
sudo chmod a+x /usr/local/bin/opam
Compile Tezos from source
git clone https://gitlab.com/tezos/tezos.git && cd tezos && git checkout mainnet
opam init --bare.  # answer twice yes (y)
make build-deps
eval $(opam env)
make # be patient this take a while
export PATH=~/tezos:$PATH
source ./src/bin_client/bash-completion.sh
export TEZOS_CLIENT_UNSAFE_DISABLE_DISCLAIMER=Y
Compile Tezos developer tools
make build-deps
make build-dev-deps # be patient this take a while
eval $(opam env)
make
Use a Tezos snapshot
tezos-snapshots provide Automatic tezos blockchain daily snapshot releases and will save us days of synchronization. It took me 10 min using Wifi ac to download a full node snapshot archive.
We install jq. a lightweight and flexible command-line JSON processor to be able to parse the JSON Github API response to locate the latest set of files.
sudo apt install -y jq
We run the following CURL that will download multiple splitted files, each 2GB, as Github limit asset size.
curl -s https://api.github.com/repos/Phlogi/tezos-snapshots/releases/latest | jq -r ".assets[] | select(.name) | .browser_download_url" | grep full | xargs wget -q --show-progress
you will see a set of files like this, note the block number BL4zuJwRkJdeQBqmhmExP4uapNebCN8BRjMZdXBXDgadfF1Fk2b
mainnet.full.2020-05-12_04-15.BL4zuJwRkJdeQBqmhmExP4uapNebCN8BRjMZdXBXDgadfF1Fk2b.948666.chain.xz.00
mainnet.full.2020-05-12_04-15.BL4zuJwRkJdeQBqmhmExP4uapNebCN8BRjMZdXBXDgadfF1Fk2b.948666.chain.xz.01
Extract them all into a new file mainnet.importme by running:
cat mainnet.full.* | xz -d -v -T0 > mainnet.importme
Time now to interact with our Tezos node! first lets create our node identity
./tezos-node identity generate
return
Stored the new identity (idsmxxxxxxxxxxxxxxxxxxxxxxxxx) into '/home/hp/.tezos-node/identity.json'.
Lets import the snapshot
./tezos-node snapshot import mainnet.importme --block BL4zuJwRkJdeQBqmhmExP4uapNebCN8BRjMZdXBXDgadfF1Fk2b

May 12 17:37:34 - snapshot: Importing data from snapshot file mainnet.importme
May 12 17:37:34 - snapshot: Retrieving and validating data. This can take a while, please bear with us
Context: 1985K elements, 152MiB read
open a new terminal and check the synchronization status by running
./tezos-client bootstrapped

Disclaimer:
  The  Tezos  network  is  a  new  blockchain technology.
  Users are  solely responsible  for any risks associated
  with usage of the Tezos network.  Users should do their
  own  research to determine  if Tezos is the appropriate
  platform for their needs and should apply judgement and
  care in their network interactions.

Current head: BLxAyj1KNCeg (timestamp: 2020-05-12T16:19:08-00:00, validation: 2020-05-12T16:19:24-00:00)
Bootstrapped.
Stop the node running by killing the process running on port 8732/9732
sudo kill -9 `sudo lsof -t -i:8732`
sudo kill -9 `sudo lsof -t -i:9732`
restart node, we use screen to run the node in the background, not attached to this terminal.
cd ~/tezos/
screen -S TezosNode
./tezos-node run --rpc-addr 127.0.0.1
<CTRL>D
To re-enter the screen process then you just re-attach to that screen. Useful if you want to kill the process.
screen -r TezosNode
Congratulation, you have a running full Tezos node!!!!
Connecting Nanoledger S HSM

A hardware wallet is a cryptocurrency wallet which stores the user’s private keys (critical piece of information used to authorize outgoing transactions on the blockchain network) in a secure hardware device. Ledger Nano S is a hardware wallet that is used for the storage of and transactions in popular cryptocurrencies like Bitcoin, Ethereum and other popular altcoins.
You can use the more expensive (has a lot more features and can run 100 apps/coins at the same time) Ledger Nano X, but it make just no sense: Your nano ledger will just run one Application: the Tezos Baking App.
On Linux you need first to create a set of udev rules to allow device access. So Follow https://support.ledger.com/hc/en-us/articles/115005165269-Fix-connection-issues
Install Ledger Live, initialize properly the Ledger Nano S. Install Tezos Baking on your Ledger Nano S. If you are using Ledger live, go to Settings -> Toggle ‘Developer Mode’ on. Then, go to Manager and install ‘Tezos Baking’ app.
Open the Tezos Baking app on your ledger device.
find your nanoledger by running:
./tezos-client list connected ledgers

## Ledger `uncommon-havanese-sorrowful-monkey`
Found a Tezos Wallet 2.2.5 (git-description: "") application running on
Ledger Nano S at [0003:0005:00].

To use keys at BIP32 path m/44'/1729'/0'/0' (default Tezos key path), use one
of:
  tezos-client import secret key ledger_hp "ledger://uncommon-havanese-sorrowful-monkey/bip25519/0h/0h"
  tezos-client import secret key ledger_hp "ledger://uncommon-havanese-sorrowful-monkey/ed25519/0h/0h"
  tezos-client import secret key ledger_hp "ledger://uncommon-havanese-sorrowful-monkey/secp256k1/0h/0h"
  tezos-client import secret key ledger_hp "ledger://uncommon-havanese-sorrowful-monkey/P-256/0h/0h"
We create an ALIAS ‘ledger_hp’ to avoid typing this long identifier, we select the first derivation path. If you use TezBox use the second ed25519 derivation path.
./tezos-client import secret key 'ledger_hp' "ledger://uncommon-havanese-sorrowful-monkey/bip25519/0h/0h"

Please validate (and write down) the public key hash displayed on the Ledger,
it should be equal
to `tz1xxxxxxxxxxxxxxxxxxxxxxxxxxxxxxxxxxxxxx`:

# check public address and confirmed on nanoledger, you should see

Tezos address added: `tz1xxxxxxxxxxxxxxxxxxxxxxxxxxxxxxxxxxxxxx`
We now setup ledger to bake for the account, the last block number can be found at https://tzstats.com/
./tezos-client setup ledger to bake for 'ledger_hp' --main-hwm '949464'

Setting up the ledger:
* Main chain ID: 'Unspecified' -> NetXdQprcVkpaWU
* Main chain High Watermark: 0 -> 949509
* Test chain High Watermark: 0 -> 0
Authorized baking for address: tz1xxxxxxxxxxxxxxxxxxxxxxxxxxxxxxxxxxxxxx
Corresponding full public key: edpxxxxxxxxxxxxxxxxxxxxxxxxxxxxxxxxxxxxxxxxxxxxxxxxxxxxxxxx
set the high water mark level to the current block to prevent any double baking
./tezos-client set ledger high watermark for 'ledger_hp' to '949511'
Now we need the chain ID
./tezos-client rpc get /chains/main/chain_id

return
"NetXdQprcVkpaWU"
And run now with the proper chain ID
./tezos-client setup ledger to bake for 'ledger_hp' --main-chain-id "NetXdQprcVkpaWU"

return
Setting up the ledger:
* Main chain ID: NetXdQprcVkpaWU -> NetXdQprcVkpaWU
* Main chain High Watermark: 949511 -> 949511
* Test chain High Watermark: 949511 -> 949511
Authorized baking for address: tz1xxxxxxxxxxxxxxxxxxxxxxxxxxxxxxxxxxxxxx
Corresponding full public key: edpxxxxxxxxxxxxxxxxxxxxxxxxxxxxxxxxxxxxxxxxxxxxxxxxxxxxxxxx
Victory!
Start the baker process
The Tezos network has successfully upgraded to protocol 006 following an on-chain governance process. The self-amending governance network upgraded from the Babylon protocol to Carthage at block 851,969, bringing about a gas limit increase and various other small fixes for the network.
The baker is a daemon that once connected to an account, computes the baking rights for that account, collects transactions from the mempool and bakes a block. Note that the baker is the only program that needs direct access to the node data directory for performance reasons.
https://tezos.gitlab.io/introduction/howtorun.html#baker
The baker require local access to the data files that the node creates. The Tezos blockchain data is stored in an LMDB database, and the baker requires access to these files while it is operating, so the baker should be running on the same system as the Tezos node.
It will take at least 2 cycles before you get rights in a snapshot and 5 cycles before you start to bake (cycle is just under 3 days). in Tezos, snapshot is the schedule for baking rights.
open a new terminal and run
cd ~/tezos/
screen -S TezosBaker
./tezos-baker-006-PsCARTHA run with local node ~/.tezos-node 'ledger_hp'
<CTRL>D
Start the endorser process
The endorser is a daemon that once connected to an account, computes the endorsing rights for that account and, upon reception of a new block, verifies the validity of the block and emits an endorsement operation. It can endorse for a specific account or if omitted it endorses for all accounts.
https://tezos.gitlab.io/introduction/howtorun.html#endorser
The endorser don’t need to run on the same system as the Tezos node. It can run on a completely separate system, or on the same system, and only require communication with the Tezos node over RPC (to port 8732 by default).
open a new terminal and run
cd ~/tezos/
screen -S TezosEndorser
./tezos-endorser-006-PsCARTHA run 'ledger_hp'
<CTRL>D
Start the accuser process
The accuser is a daemon that monitors all blocks received on all chains and looks for:
- bakers who signed two blocks at the same level
- endorsers who injected more than one endorsement operation for the same baking slot (more details here)
Upon finding such irregularity, it will emit respectively a double-baking or double-endorsing denunciation operation, which will cause the offender to loose its security deposit. The accuser don’t need to run on the same system as the Tezos node. It can run on a completely separate system, or on the same system, and only require communication with the Tezos node over RPC (to port 8732 by default).
https://tezos.gitlab.io/introduction/howtorun.html#accuser
open a new terminal and run
cd ~/tezos/
screen -S TezosAccuser
./tezos-accuser-006-PsCARTHA run
<CTRL>D
Automating payouts
You need to set your own fee in whatever software you use to manage payouts. There are 2 tools that I recommend you to try:
TRD is a software for distributing staking rewards of delegators introduced in detail in this Medium article. This is not a script but a full scale application which can continuously run in the background as a Linux service. It can track cycles and make payments. However it does not have to be used as a service, but it can also be used interactively. The documentation can be found here. https://github.com/habanoz/tezos-reward-distributor
Bäckerei is tooling written by Cryptium Tezos Bäckerei. At a high level it manages the payments from the baker, to your delegators. Bäckerei is initialised with a TZ1 address which is used for baking. When run, it connects to a full-node and scans the entire transaction history to determine who the delegators are and how much they should get paid. Note that this full-node must be trusted. https://github.com/cryptiumlabs/backerei
Useful commands
coming soon.
Some resources
Neo Geo Arcade Stick Pro Hacking
[et_pb_section fb_built=”1″ _builder_version=”4.4.3″][et_pb_row _builder_version=”4.4.3″][et_pb_column type=”4_4″ _builder_version=”4.4.3″][et_pb_text _builder_version=”4.4.3″ custom_padding=”||0px|||”]
It comes preloaded with 20 of SNKs best retro fighting games for you to choose from. Use a HDMI cable to attach your arcade stick Pro to your TV to play in Console mode. Hook up NEOGEO mini game pads for some multiplayer action. The arcade stick Pro also has the ability to connect to your computer, a NEOGEO mini or an Android device to unlock even more ways to use this unique device. You also have the ability to rearrange the buttons.
[/et_pb_text][et_pb_image src=”https://www.waltercedric.com/wp-content/uploads/2020/04/Neogeo-Arcade-Stick-Pro-3.png” url=”https://amzn.to/3cAhRqO” _builder_version=”4.4.3″][/et_pb_image][et_pb_text _builder_version=”4.4.3″]
Love classic SNK fighting games? This is the Console for you. Comes preloaded with 20 of best retro fighting games for you to choose from. Use a HDMI cable to attach your arcade stick Pro to your TV to play in Console mode. You have the option to hook up NEOGEO mini game pads for some multiplayer action. The arcade stick Pro also has the ability to connect to your computer, a NEOGEO mini or an Android device and act as a Controller for your games on these systems to unlock even more ways to use this unique device. The joystick is a SNK electrostatic style unit to really give you the precise movements. You also have the ability to rearrange the buttons to your liking to really make this a One of a kind video game system!
[/et_pb_text][et_pb_image src=”https://www.waltercedric.com/wp-content/uploads/2020/04/Neogeo-Arcade-Stick-Pro-4.png” url=”https://amzn.to/3cAhRqO” _builder_version=”4.4.3″][/et_pb_image][et_pb_text _builder_version=”4.4.3″]
My quick review
The emulation runs a lot smoother on this than the mini and it outputs at a higher resolution (720p). You can also use it as a controller for your Sony PS3 or PC.
Yes you can add more games to it! by hacking it 😉 By default there is 27 fighters, 3 sports and 10 action games (including all Metal Slug)
You can also use this purely as a fight stick and plug it in to consoles or PC which is nice. buttons can be swapped easily for Sanwa
You must buy an HDMI cable and a power supply (USB 5V) to play on a HDTV. The unit is powered by usb type C.
18 more games will be unlocked for free, just visit https://www.snk-corp.co.jp/us/neogeoarcadestickpro/upgrade/
[/et_pb_text][/et_pb_column][/et_pb_row][et_pb_row _builder_version=”4.4.3″][et_pb_column type=”4_4″ _builder_version=”4.4.3″][et_pb_image src=”https://www.waltercedric.com/wp-content/uploads/2020/04/Neogeo-Arcade-Stick-Pro-1.png” url=”https://amzn.to/3cAhRqO” _builder_version=”4.4.3″][/et_pb_image][/et_pb_column][/et_pb_row][et_pb_row _builder_version=”4.4.3″][et_pb_column type=”4_4″ _builder_version=”4.4.3″][et_pb_text _builder_version=”4.4.3″]
How to add games to the SNK NEOGEO Arcade Stick Pro
[/et_pb_text][et_pb_text _builder_version=”4.6.0″ hover_enabled=”0″ sticky_enabled=”0″]
-
Download ROM from https://t.me/NeoGeoCFW. you need to install Telegram
-
Copy 3 files to the memory stick root.
-
Insert the memory stick to the SNK NEOGEO Arcade Stick Pro
-
Go to the Setting, then System, choose the System upgrade. The Arcade Stick Pro will search for an upgrade file automatically.
-
The upgrade file will be available. Click the confirm button.
-
Restarting to upgrade. Upgrading takes around 20 minutes. Do not power off the Stick to avoid potential risk.
-
Then you will see the application selection. Go for NEOGEO Hack.
[/et_pb_text][/et_pb_column][/et_pb_row][et_pb_row _builder_version=”4.4.3″][et_pb_column type=”4_4″ _builder_version=”4.4.3″][et_pb_image src=”https://cedricwalter.files.wordpress.com/2021/12/3241f-neogeo-arcade-stick-pro-5.png” url=”https://amzn.to/3cAhRqO” _builder_version=”4.4.3″][/et_pb_image][/et_pb_column][/et_pb_row][/et_pb_section][et_pb_section fb_built=”1″ _builder_version=”4.4.3″][et_pb_row _builder_version=”4.4.3″ global_module=”13251″][et_pb_column type=”4_4″ _builder_version=”4.4.3″][et_pb_text _builder_version=”4.4.3″ _dynamic_attributes=”content” text_font=”|600|||||||” text_text_color=”#0C71C3″ text_font_size=”17px” link_text_color=”#000000″ link_font_size=”25px” link_letter_spacing=”2px”]@ET-DC@eyJkeW5hbWljIjp0cnVlLCJjb250ZW50IjoicG9zdF90YWdzIiwic2V0dGluZ3MiOnsiYmVmb3JlIjoiUmVsYXRlZCBUb3BpY3M6IiwiYWZ0ZXIiOiIiLCJsaW5rX3RvX3Rlcm1fcGFnZSI6Im9uIiwic2VwYXJhdG9yIjoiLy8iLCJjYXRlZ29yeV90eXBlIjoicG9zdF90YWcifX0=@[/et_pb_text][/et_pb_column][/et_pb_row][/et_pb_section]
Ubuntu 20.04 Release Date & Planned Features
[et_pb_section fb_built=”1″ admin_label=”section” _builder_version=”3.22″][et_pb_row admin_label=”row” _builder_version=”3.25″ background_size=”initial” background_position=”top_left” background_repeat=”repeat”][et_pb_column type=”4_4″ _builder_version=”3.25″ custom_padding=”|||” custom_padding__hover=”|||”][et_pb_text admin_label=”Text” _builder_version=”3.27.4″ background_size=”initial” background_position=”top_left” background_repeat=”repeat”]
Ubuntu 20.04 LTS is due to be released on April 23, 2020! Again this LTS release will feature a number of iterative improvements, usability and user interface refinements, and some much needed updates.
For now the 20.04 BETA is available HERE or you can also upgrade before (not recommended) or better after the 23 April with
sudo do-release-upgrade -d
The best is really to wait a bit more, assuming your system is fully up-to-date, You will be notified that an update is available via a dialog!
- Linux Kernel 5.4
- PHP 7.4
- Shows OEM vendor logo during boot
- Boot speed improvements
- New dark theme option
- GNOME 3.36
- Improved performance
- Redesigned login and lock screens
- Snap-based Ubuntu Software app
- Improved GNOME Shell performance
- Improved ZFS support
- Fractional scaling toggle
Ninebot KickScooter MAX G30D
The Segway MAX G30D is specially designed for Switzerland and Germany and complies with traffic regulations. The best choice for a high quality and comfortable driving experience. The scooter has a particularly long range, up to 65km. The tubeless pneumatic tires help you to achieve greater riding comfort and the LED lights at the front and rear, the reflectors and the bell offer you the greatest safety when driving.

- First street-legal KickScooter in its class with ABE approval
- Serial number and integrated holder for the warranty sticker available
- Maximum speed is 20 km/h*
- Range up to approx. 65 km, top performance in this class**
- 10 inch tubeless pneumatic tires for a smooth ride
- Built-in charger for fast charging
- Can climb up to 20 % gradient road
- Dual and regenerative braking system for increased safety and stability
- Water resistance IPX5 for the frame (IPX7 water resistance for the core components)
- Loud bell for pressing and side reflectors for increased safety on busy roads
What to do first
- Mount the handlebars – check and retighten all screws
- Activate the scooter. Do not charge the scooter when trying to activate: it wont work 🙂
- Install and register in the Ninebot app (iOS or Android) or login with an existing account.
- Switch on the scooter.
- The Bluetooth icon (ready for connection) lights up and you should hear a bip-bip sound.
- Click on “Vehicle” – “Scan for Vehicle” and connect to the scooter.
- A successful connection is confirmed with a beep. The Bluetooth symbol then lights up continuously.
- Follow the instructions in the app, it is recommended to follow the 2min tutorial.
- Do not install or update to the latest firmware, this will limit your capabilities to install custom firmware.
What to do regularly
Check and retighten all screws
Check and control tires pressures
| You are | Front Tire | Rear Tire |
| 50-70 kg | 30-40 psi or 2 to 2.8 bar | 40 – 50 psi or 2.8 to 3.5 bar |
| 70-90 kg | 40-45 psi or 2.8 to 3.1 bar | 45 – 55 psi or 3.1 to 3.8 bar |
| 90-100 kg | 45-50 psi or 3.1 to 3.4 bar | 50 – 55 psi or 3.4 to 3.8 bar |
| 100 kg + | 50-60 psi or 3.5 to 4.2 bar | 60-65 psi or 4.1 to 4.5 bar |
What to buy next
install fenders

Segway Ninebot Front Bag
Available in 2, 2.5, 3 or 4 liters size, rain resistant

Enable 1200 mw Mode on DJI FPV System
[et_pb_section fb_built=”1″ _builder_version=”3.22″][et_pb_row _builder_version=”3.25″ background_size=”initial” background_position=”top_left” background_repeat=”repeat”][et_pb_column type=”4_4″ _builder_version=”3.25″ custom_padding=”|||” custom_padding__hover=”|||”][et_pb_text _builder_version=”3.27.4″ background_size=”initial” background_position=”top_left” background_repeat=”repeat”]
NOTES
- You should follow your local regulations regarding which mode to use.
- Long term hardware effects are unknown
- You get more or less 30% more range
- Your system must be already in FCC mode
- Enable Power Limit as it add some protections against overheating.
- Create a .txt file, name it
naco_pwr.txt - Type
pwr_2or pwr_1- pwr_1 = 1000 mW
- pwr_2 = 1200 mW & 1000 mW
- Save and close
- Copy
naco_pwr.txtto an SD card - Put SD card in DJI goggles
- Power on Goggles and Air Unit
Now in the Goggles menu, under Settings -> Device, you should be able to select 1200 mW or 1000 mW
[/et_pb_text][/et_pb_column][/et_pb_row][et_pb_row _builder_version=”4.4.3″ global_module=”13251″][et_pb_column type=”4_4″ _builder_version=”4.4.3″][et_pb_text _builder_version=”4.4.3″ _dynamic_attributes=”content” text_font=”|600|||||||” text_text_color=”#0C71C3″ text_font_size=”17px” link_text_color=”#000000″ link_font_size=”25px” link_letter_spacing=”2px”]@ET-DC@eyJkeW5hbWljIjp0cnVlLCJjb250ZW50IjoicG9zdF90YWdzIiwic2V0dGluZ3MiOnsiYmVmb3JlIjoiUmVsYXRlZCBUb3BpY3M6IiwiYWZ0ZXIiOiIiLCJsaW5rX3RvX3Rlcm1fcGFnZSI6Im9uIiwic2VwYXJhdG9yIjoiLy8iLCJjYXRlZ29yeV90eXBlIjoicG9zdF90YWcifX0=@[/et_pb_text][/et_pb_column][/et_pb_row][/et_pb_section]Enable FCC Mode on DJI FPV System (700mw 8 Channels)
In CE mode, the maximum output is limited to 25 mW, and there are only 4 channels available, while in FCC mode those numbers are increased to 700 mW and 8 channels.
NOTE that you should follow your local regulations regarding which mode to use.
How to switch to FCC mode from CE mode
- Take the micro SD Card out of the Air Unit
- Create a text file on the root directory, name it
naco.txt - Write
1in the file, which means FCC mode for USA or any other number according to this list:- 1 – FCC mode for US, 8 Channels
- 2 – FCC mode for Canada 4 Channels
- 3 – HK CE 4 Channels
- 4 – CN SRRC 4 Channels
- 5 – JP Japan 3 Channels
- 6 – KR Korea 4 Channels
- 7 – BR Brazil 4 Channels
- 8 – FR CCA 4 Channels
- Insert SD card in the Air Unit
- Power up goggles, and then Air Unit
in the Player menu you should see now 8 channels.
Attention updating the firmware on your DJI FPV goggles and Air Unit will always reset the power setting back to the default settings according to your region!
